Maintenance Dashboard
On the Maintenance Dashboard a user can see the reports for Maintenance Expenses by Unit and by Vendor. Also a Fleet Summary showing an overview of the fleet of units by condition, maintenance type, repair type, equipment type, year, make, model, engine and unit status.


Maintenance / Add a new maintenance
Step 1.
Click on New Maintenance from the Maintenance menu

Step 2.
Click on

to add new maintenance.

Step 3.
Add information about the maintenance work completed.
- Select the Unit #. By selecting the Unit # the other info in the Vehicle Info section will populate.
- Select Maintenance Type: Planned Maintenance or Unplanned.
- Select Repair Type, depending on where the truck broke down. This can happen in two locations (Road breakdown or Parking Repair).
- Latitude and Longitude shows the current location of the truck based on the last location in the Dispatch module. If this is not the correct location, just click on Change Current Location button, and select the new location for the Unit.
- The Odometer field takes info from Current Odometer Reading on Tractor/Trailer form
Enter Start Date when the Vendor started working on the repair. By entering the start date, the status of the Maintenance changes to In Progress.
- Driver Info section - will populate based on the driver(s) assigned to the Unit # selected.
- Select a Vendor from the drop down, or search for a Vendor by city/zip with specific distance or from Location (in General Info) where it is said the tractor/trailer is currently located.

Step 4.
To Add New Vendor click on

in the Vendor Info section.
Enter the Information for the new Vendor and click


Step 5.
Click on
to add the repair items from the Items section.

Click on UPLOAD FILES if you would like to upload any additional document related to the maintenance.
5.1
Fill out all the Repair Information (Choose Repair Name, Quantity, Part Cost, Hours of Labor, Labor Rate, Miscellaneous Cost, Sales Tax and Select GL Account). If you would like to apply a Driver Chargeback for the selected Repair, mark Driver Chargeback, enter the Chargeback amount and Click on Add Item.
* To add more options in the Repair Name field please email support@smartboardtms.com.
You can also always click on Other from the Repair Name options and a free form entry field will show up to enter the specific repair info.


5.2
Continue with adding the next repair item. When finished adding all the repair Items, click on


Step 6.
Next to each repair item in the Repair Items table there are Edit, Delete and Complete buttons.

Edit - updates the info for the specific repair item.

Delete - deletes the repair item.

Complete the repair on click on this icon.


Step 7.
To Complete the Maintenance click on

button under the Items Table.
Before that you have to acknowledge that all repair items have been completed and you have entered a Completed date.
After that, enter the Invoice Number, Invoice Date, choose Payment Terms and click

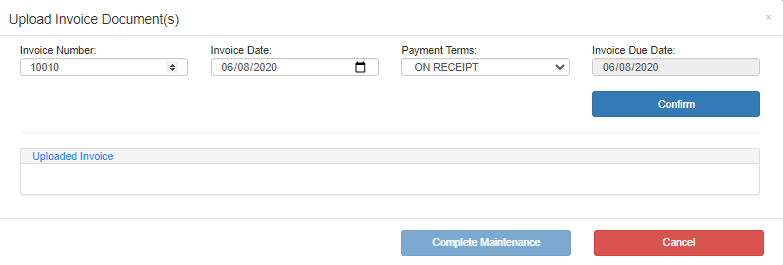
<
7.1
Upload the Vendor Invoice and Click on


Step 8.
If the

field is marked, the amount of chargeback will appear on the Statement for the driver as a Deduction.
8.1
Select the Chargeback Amount from the Deduction table.

8.2
The Chargeback amounts will be added on the driver statement.

Add new maintenance from tractor/trailer form
Step 1.
Click on Trucks or Trailers from the Safety menu.

Step 2.
Select Tractor/Trailer, click on the Update button and then click on Maintenance.

Step 3.
Click on

to add new maintenance.

Step 4.
Add information about the maintenance work completed.
- Select the Unit #. By selecting the Unit # the other info in the Vehicle Info section will populate.
- Select Maintenance Type: Planned Maintenance or Unplanned.
- Select Repair Type, depending on where the truck broke down. This can happen in two locations (Road breakdown or Parking Repair).
- Latitude and Longitude shows the current location of the truck based on the last location in the Dispatch module. If this is not the correct location, just click on Change Current Location button, and select the new location for the Unit.
- The Odometer field takes info from Current Odometer Reading on Tractor/Trailer form
- Enter Start Date when the Vendor started working on the repair. By entering the start date, the status of the Maintenance changes to In Progress.
- Driver Info section - will populate based on the driver(s) assigned to the Unit # selected
- Select a Vendor from the drop down, or search for a Vendor by city/zip with specific distance or from Location (in General Info) where it is said the tractor/trailer is currently located.

Step 5.
To Add New Vendor click on

in the Vendor Info section.
Enter the Information for the new Vendor and click


Step 6.
Click on

to add the repair items from the Items section.

6.1
Fill out all the Repair Information (Repair Name, Quantity, Part Cost, Hours of Labor, Labor Rate, Miscellaneous Cost, Sales Tax and Select GL Account.
If you would like to apply a Driver Chargeback for the selected Repair, mark Driver Chargeback,
enter the Chargeback amount and Click


6.2
Continue with adding the next repair item. When finished adding all the repair Items, click on


Step 7.
Next to each repair item in the Repair Items table there are Edit, Delete and Complete buttons.

Edit - updates the info for the specific repair item

Delete - deletes the repair item

Complete the repair by clicking on this icon


Step 8.

button under the Items Table.
Before that you have to acknowledge that all repair items are completed and you have entered a Completed date.
After that, enter the Invoice Number, Invoice Date, choose Payment Terms and click


8.1
Upload the Vendor Invoice and Click


Step 9.
If the

field is marked,
the amount of chargeback will appear on the Settlement for the driver as a Deduction.
9.1
Select the Chargeback Amount from the Deductions table.

9.2
The Chargeback amounts will be added on the driver statement.

How to set up a maintenance alert
Step 1.
Click on Planned Maintenance from the Maintenance menu.

Step 2.
Click on

to add a new Maintenance Alert.

Step 3.
Add the following information for the Maintenance Alert:
- Select Unit Type: Tractor or Trailer.
- Specify the Alert Type.
- Select Unit. One or more units can be selected.
- Set Up the Alert by Days, Miles or Engine Hours.
- Set Up the Reminder - before how many Days, Miles or Engine Hours you would like to receive the reminder for the Alert.
- Use ELD odometer miles - If your account has been integrated with your ELD provider, by checking this box the alert will use the ELD miles.
- If the alert you set up is per day, choose the Start Date of the Alert.
- Select which Roles you would like to receive the Alert notifications.
- Select which Users you would like to receive the Alert notifications.
If you would like Alerts Notifications to be sent to the Driver of the Unit, check the box

Then click


3.1
All the Maintenance Alerts will show up in the table below in three different colors:
Red : Past Due Maintenance Alerts
Yellow : Due Soon Maintenance Alerts (Alerts due in the next 30 days, 3,000 miles or 300 Engine Hours)
Green : Maintenance Alerts on Schedule

Step 4.
After the Maintenance Alert is set up you will receive alert notifications via email twice. The first notification will be sent when you set up to get the reminder. The second notification will be sent when the alert becomes past due (either the alert is due 0 days or 0 miles).

Step 5.
You can complete the Maintenance Alert by clicking on

from the email or by clicking on the

button from the Planned Maintenance table.

How to complete a maintenance alert
Step 1.
Click on Planned Maintenance from the Maintenance menu.

Step 2.
In the Actions column from the Maintenance Table click on the

button

Step 3.
The form to enter maintenance will open. Add the following information to Complete the Maintenance Alert:
- Unit Information - will populate based on which unit is selected when the alert is created.
- Maintenance type will be preselected to Planned.
- Select Repair Type (Road breakdown or Parking Repair).
- Enter Start Date when the Vendor started working on the repair. By entering the start date, the status of the Maintenance changes to In Progress.
- Latitude and Longitude shows the current location of the truck based on the last location in the Dispatch module. If this is not the correct location, just click on Change Current Location button, and select the new location for the Unit.
- The Odometer field takes info from Current Odometer Reading on Tractor/Trailer form
- Driver Info section - will populate based on the driver(s) assigned to the Unit # selected.
- Select a Vendor from the drop down, or search for a Vendor by city/zip with specific distance or from Location (in General Info) where it is said the tractor/trailer is currently located.

Step 4.
Click on

to add the repair items from the Items section.

4.1
Fill out all the Repair Information (Repair Name, Quantity, Part Cost, Hours of Labor, Labor Rate, Miscellaneous Cost, Sales Tax and Select GL Account).
If you would like to apply a Driver Chargeback for the selected Repair, mark Driver Chargeback,
enter the Chargeback amount and Click


Step 5.
Next to each repair item in the Repair Items table there are Edit, Delete and Complete buttons.

Edit - updates the info for the specific repair item

Delete - deletes the repair item

Complete the repair on click on this icon

Step 6.
To Complete the Maintenance click on

button under the Items Table.
Before that you have to acknowledge that all repair items have been completed and you have entered a Completed date.
After that, enter the Invoice Number, Invoice Date, choose Payment Terms and click


6.1
Upload the Vendor Invoice and Click on


Step 7.
After the expired Maintenance Alert is Completed, the Alert will reset for the original number of days/miles/hours the alert is set to expire.

How to add claims
Step 1.
Click on Claims from the Safety menu.

Step 2.
Click on

to add new Claim.

Step 3.
Fill out the Information for the Claim and click

In Type of Insurance select the type of a claim you are entering. If this field is empty on your account, please fill out the Insurance coverages in Administration -> Support tables.


Step 4.
You can repeat this process from the Dispatch or Billing & AR menu by entering a claim directly on the selected trip.

Set up the settings for cost per mile report
Step 1.
Click on Cost per Mile from the Maintenance menu.

Step 2.
Click on Settings for Cost per Mile Report.

Step 3.
Fill out the following information:
- Choose Unit type Tractor or Trailer.
- Select the Equipment year.
- Depending what you have selected Tractor or Trailer, enter the information for Make, Model and Engine.
- Set up the Maintenance category for Threshold, Target and Superior values with yours criteria.
Click


Cost per mile report
Step 1.
Click on Cost per Mile from the Maintenance menu.

Step 2.
Click on Cost per Mile Report
You can view the Cost per Mile report by unit number (the table on the right side) or view the average cost per mile per Equipment Year, Make, Model and Engine (the table on the left side of the screen).
Both tables provide options to view Trucks only, view Trailers only, or View All Equipment, and options to view Company Trucks only, Contractor/Owner Operator Trucks or All Trucks.
The color in the Cost per Mile and Maintenance Cost columns will change depending on the settings you set up for the Threshold, Target and Superior categories.
If the following settings are set up for 2020 Freightliner Cascadia with Detroit engine:

Then if the cost per mile and maintenance cost is between:
1. Superior - $0.00 - $0.25 or $0.00 - $2,500.00 - the cells will be in green.
2. Target - $0.26 - $0.50 or $2,501 - $5,000.00 - the cells will be in yellow.
3. Threshold - $0.51 - $0.75 or $5,001.00 - $7,500.00 - the cells will be in orange
4. Above the Threshold level - the cells will be in red.

Step 3.
The first table on the left side of the screen shows the average cost per mile and maintenance cost for the selected equipment type. To view the specific units that belong to that category click on the number next to the Equipment type.
