Accounting / How to Create Account in Chart of Accounts
Step 1.
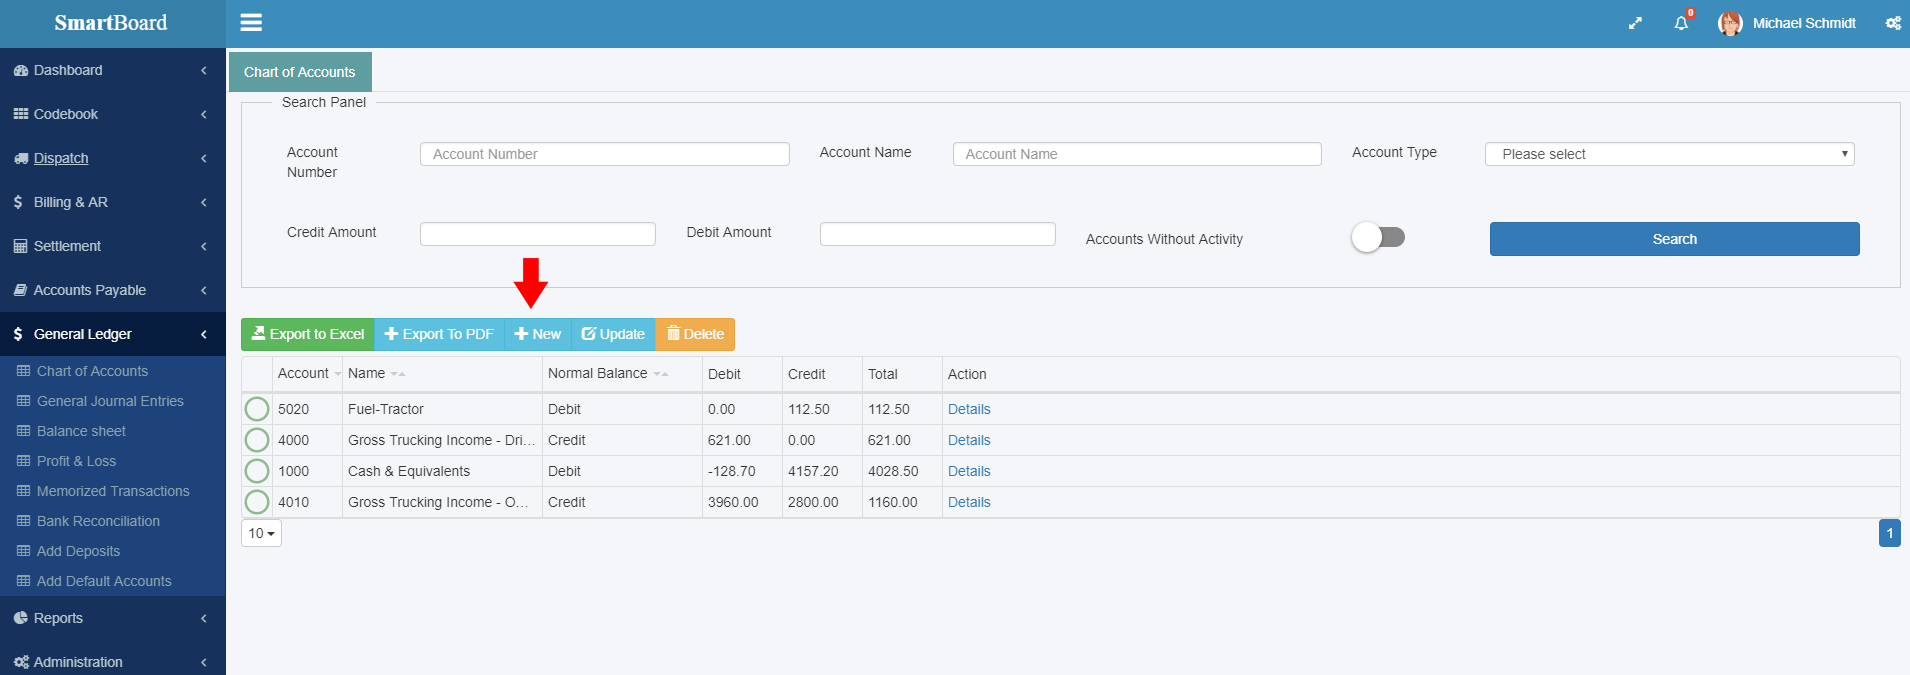
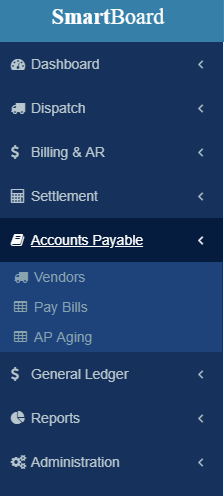
Click on Chart of Accounts under General Ledger
Step 2.
Click on “+New”
Step 3.
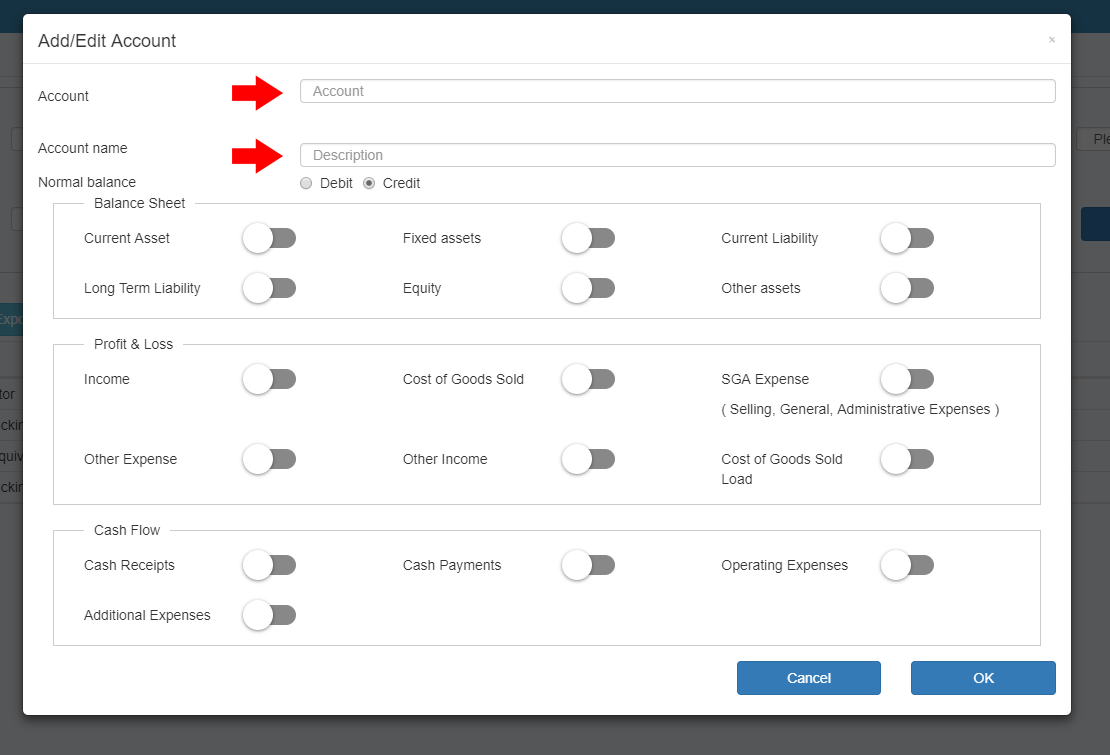
In Account field type account number and in Account name enter account name.
Step 4.
Select the account category and click OK
Accounting / Create Manual General Journal Entries
Step 1.
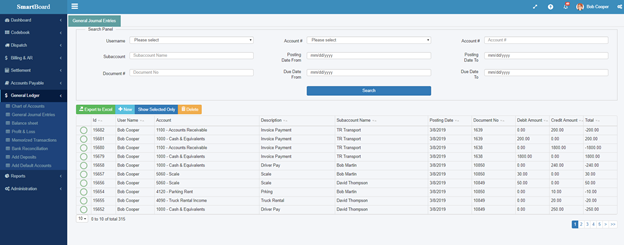
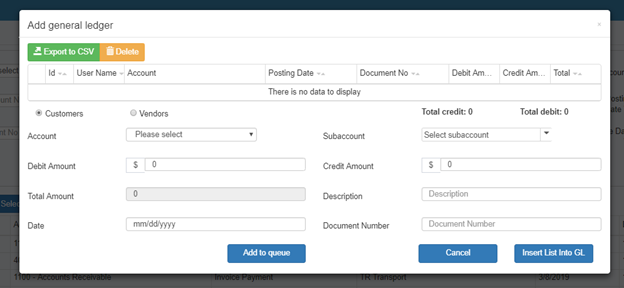
Click on General Journal Entries then click on “+New”.
Step 2.
Select Customer or Vendor
Step 3.
Select an account from the account dropdown list
Step 4.
Select Subaccount
Step 5.
Enter a debit or credit amount
Step 6.
If needed enter a description and document number.
Step 7.
Enter a date and click Add to queue.
Repeat steps 3-7 to enter all the items in this journal entry. The total amount debited must equal the total amount credited before the entries can be inserted into the General Ledger as journal entries.The posting date on all entries must be the same. Once everything is set, you will be able to click on Insert List Into GL.
Accounting / Create Memorized Transactions
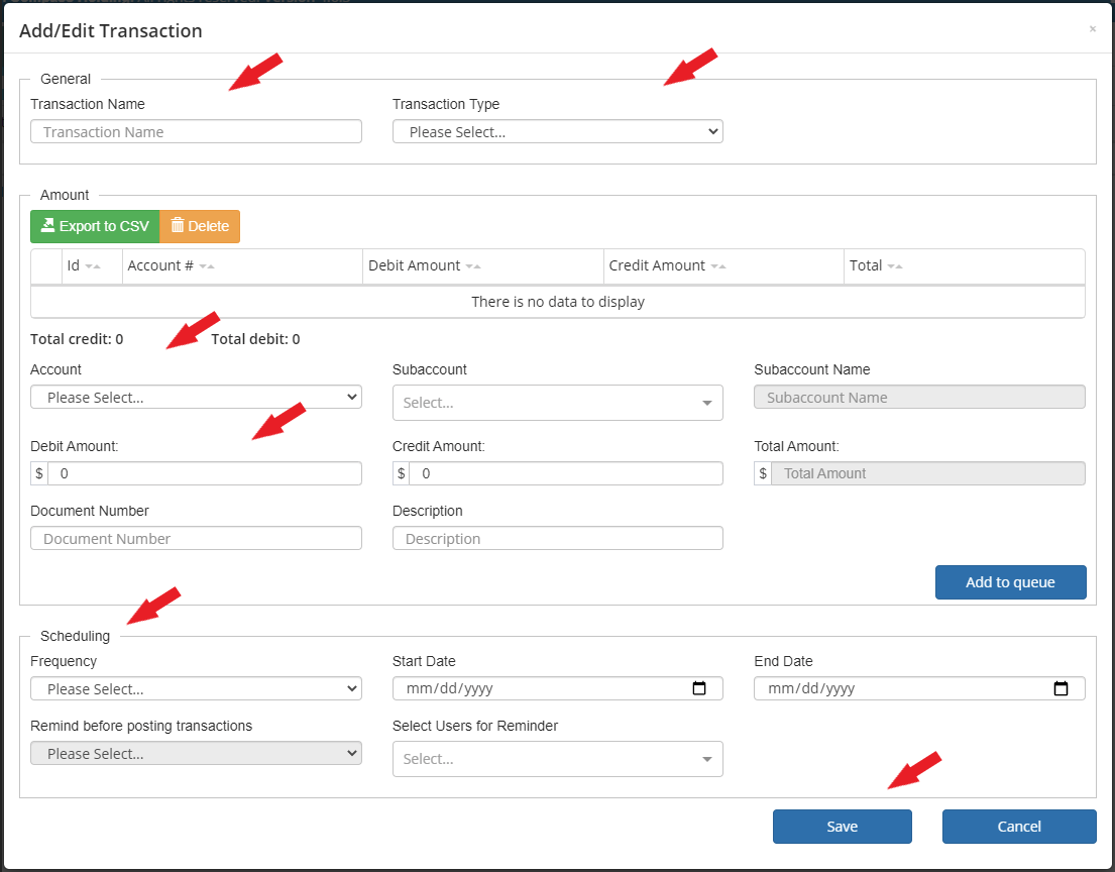
Memorized transactions are helping users and saving their time by automatically entering bills, payments, loans, interests, and any other transactions that are frequently repeating with fixed conditions (i.e., monthly/quarterly rent invoices/payments, interests).
Step 1.
Enter/ define the name of the transaction.
Step 2.
Choose transaction type.
Step 3.
Choose account, credit/ debit amount, subaccount, and all info regarding the transaction.
Step 4.
And last part it is about scheduling memorized transaction frequency of posting it. “Start date” and “End date” is period in which transaction will be posted, start date is first date and end date is the last date when the transaction will be posted.
All automatized posted transactions in G/L regarding vendors (invoices due to be paid should be visible in the part of the Account payable module ->Pay bills and in Vendor-> Vendor Payment part and it should be reflected on the AP aging as well).

If you want to change the period of the transactions automatically posting or to stop it for a while, you can do that through the update button on the landing page of the memorized transactions, and to delete it via Delete button, these changes will be applied immediately as changes are entered.

Accounting / AR Aging
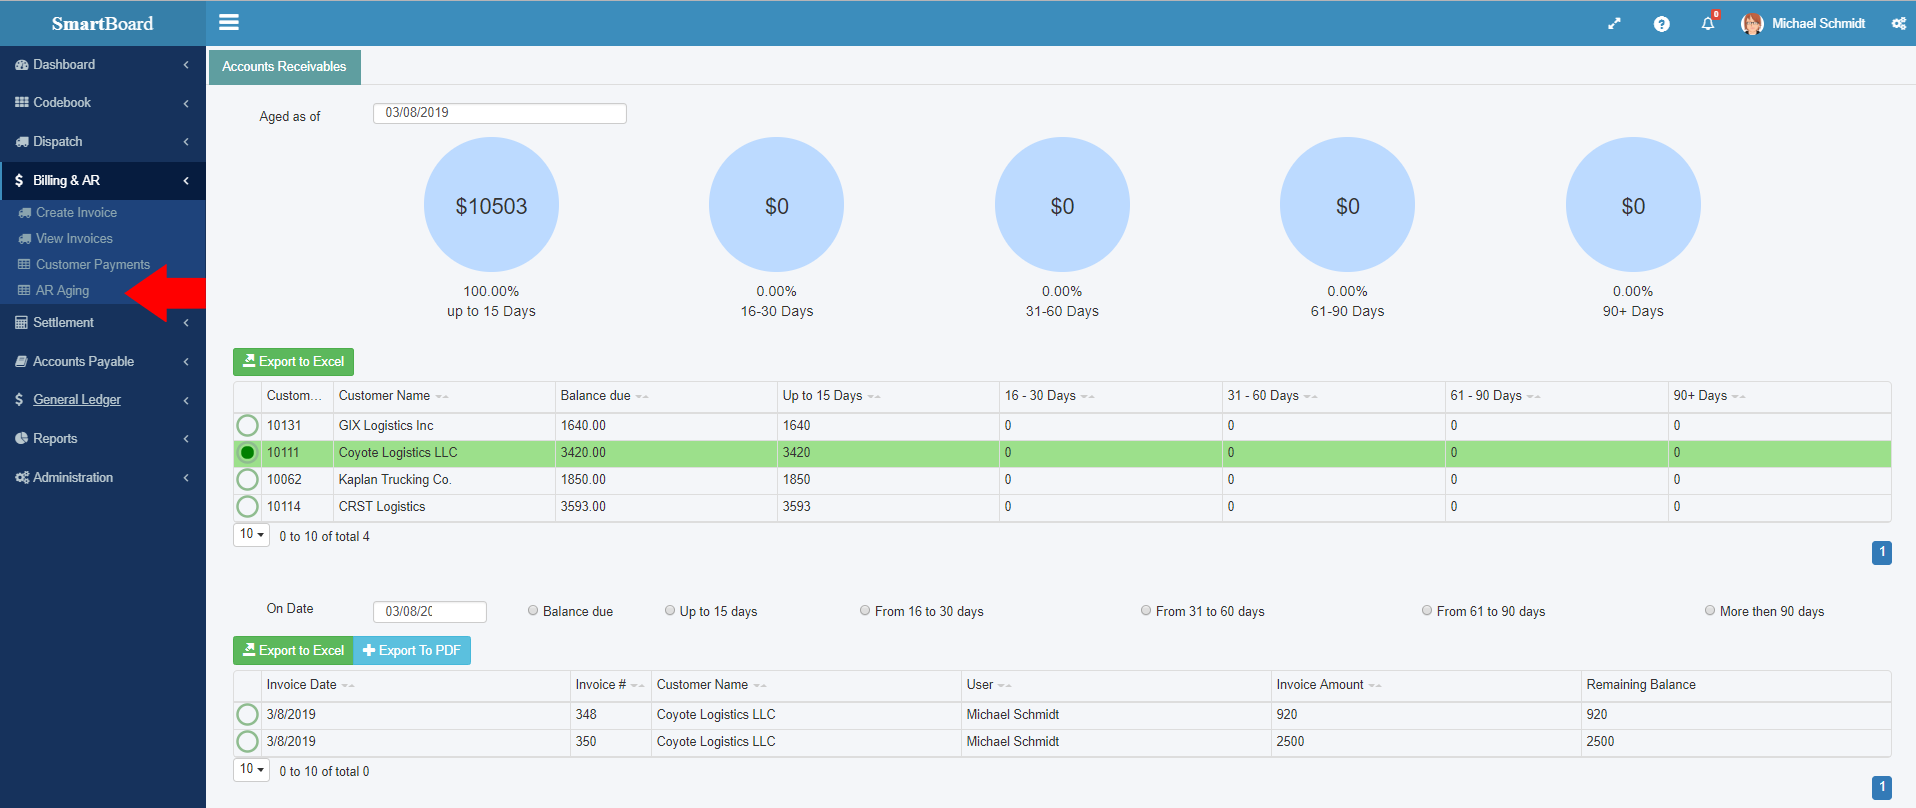
The Accounts Receivable Aging Report (Billing & AR -> AR Aging) shows all your unpaid customer invoices grouped by the number of days that have passed since you created that invoice.
The AR Aging Report will provide you with clear information on who your slow paying customers are and allow you to take action before that customer goes too far behind and ultimately protect your profits. By glancing at the AR Aging report, you will be able to make more informed decisions on which customers you would like to do business with. “Cash is King” and in today’s world you need cash flow to keep your company running. So, you would definitely not want to do business with customers that take months to pay for the loads you have delivered for them.
The report is sorted by customers, and by clicking on a customer listed in the main table you can expand it to see all the separate outstanding invoices that reflect the outstanding balance for the customer.
On top of the table, a summary is shown of the outstanding amount in each group.
• The first circle shows the total amount of all invoices that are not paid up to 15 days or less, since the day invoice is created.
• The second circle shows the total amount of all invoices that are not paid in 16-30 days from the day the invoice is created.
• The third circle shows the total amount of all invoices that are not paid in 31-60 days from the day the invoice is created.
• The fourth circle shows the total amount of all invoices that are not paid in 61-90 days from the day the invoice is created.
• The final circle shows the total amount of all invoices that are not paid over 90 days from the day the invoice is created.
Accounting / Balance Sheet
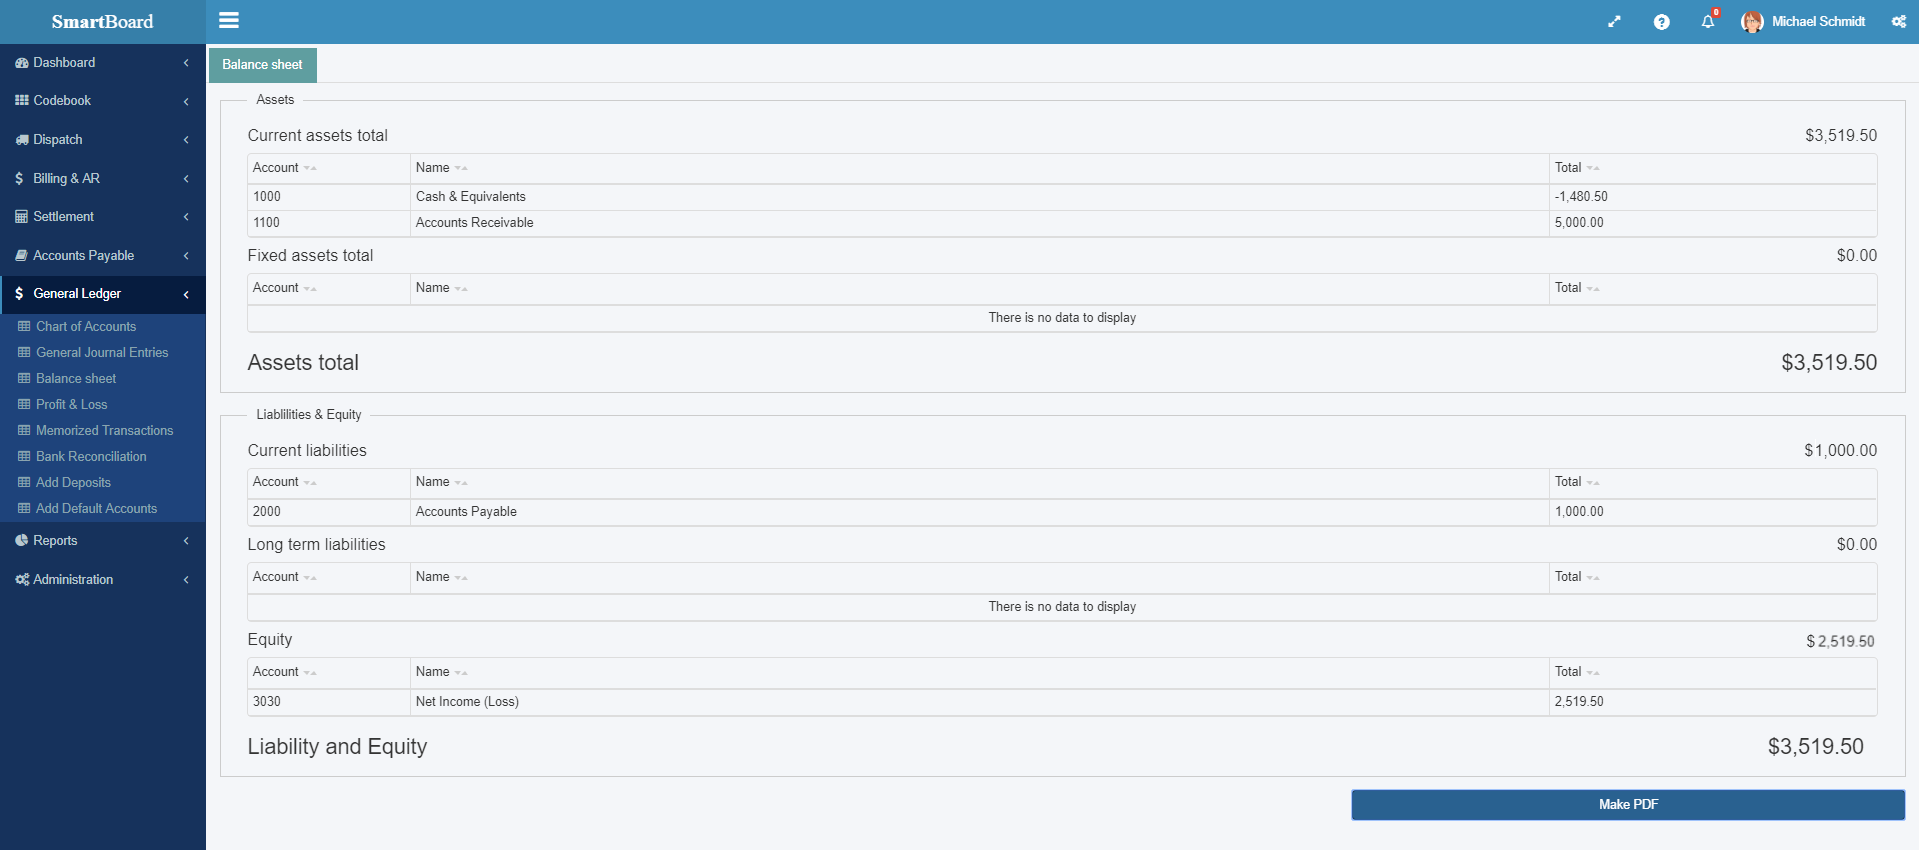
The Balance Sheet shows the total of your Assets, broken down into Current Assets and Fixed Assets, and your Total Liability and Equity, broken down into Current Liabilities, Long Term Liabilities and Equity.
The Balance sheet shows how much your company owns (assets) and how much your company owes (liabilities). A Balance Sheet helps you analyze your company’s financial strength.
Assets are things you own that have value, such as trucks and trailers. Liability is the money you’re your company owes to others, like bank credit for buying trucks and trailers.
The difference between assets and liabilities is the equity.
Assets - Liabilities = Equity
Use the Download PDF button to download the balance sheet in PDF format on your computer. You can also download to excel by clicking download to excel.
Accounting / Profit & Loss
The Profit & Loss report (General Ledger -> Profit & Loss) is the income statement of your company. This report shows how much income you have generated and how much your company have spent. Then it calculates the difference between the income and expenses, which results in your profit (or loss) for that period.
The Profit & Loss report consists of the following chart of account groups: Income, Cost of Goods Sold Load, Cost of Goods Sold, Expenses and Other Expenses
Income: Income is the first category on the Profit & Loss report and that is the revenue your company generates from the loads you are booking for your drivers. Besides revenue generated from loads, the report will show all the income accounts in your chart of accounts and how much you have brought into each one. For example, you might be generating revenue from truck or trailer rentals, cargo insurance, fines from roadside inspections and so on. For complete list of all Income accounts, use “Account Type” filter on the Chart of Accounts page.
All deductions that you are applying to your Driver settlements are applied to the Income accounts.

Cost of Goods Sold Load: Cost of Goods Sold Load is the second category on the Profit & Loss report, and it represents the direct costs associated with your core business. For example, you must pay your drivers for delivering the freight, you must pay for fuel, cargo insurance, ELD, and so on. For a complete list of all Cost of Goods Sold Load, use “account Type” filter on the Chart of Accounts page.
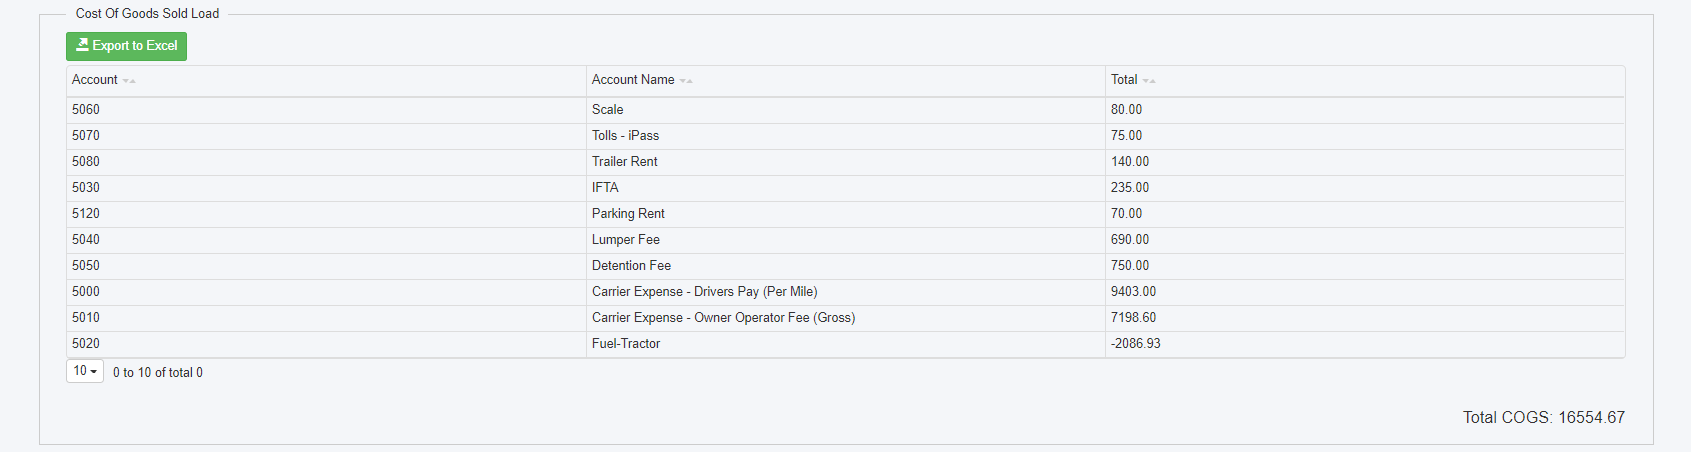
Gross Profit Load is the profit you make after subtracting the cost of goods sold load from your total income. For example, you booked the load for $1,000 and then sold the load for $1,000 to an Owner Operator who is paid 88%, your gross profit will be $120.
Gross Profit Load = Total Income - Total Cost of Goods Sold Load
Cost of Goods Sold: Cost of Goods Sold is the third category on the Profit & Loss report, and it represents the indirect costs associated with your core business. For example, the cost you pay for truck repair and maintenance, tires, oil change is included here. For a complete list of all Cost of Goods Sold Load, use “account Type” filter on the Chart of Accounts page.

Gross Profit is the profit you make after subtracting the cost of goods sold load and cost of goods sold from your total income.
Gross Profit = Gross Profit Load - Total Cost of Goods Sold
Expenses: is the fourth category on the Profit & Loss report and it consists of all the things you spent money on running your business. For example, office rent, bank fees, factoring fees, software fees all fall into this category. You are supposed to keep these expenses as low as possible.

Net Ordinary Income represents the money that is left over after you pay all your bills. If your company makes more money than it spends, your net income is a positive number. However, when your company spends more money than it makes, a loss shows up as a negative net income number.
Net Ordinary Income = Gross Profit – Expenses
Other Income/Expenses is the fifth category on the Profit & Loss report, and it relates to income and expenses that do not relate to your primary business. The most common accounts are the interest you earn from savings at your bank, or interest you pay on loans.
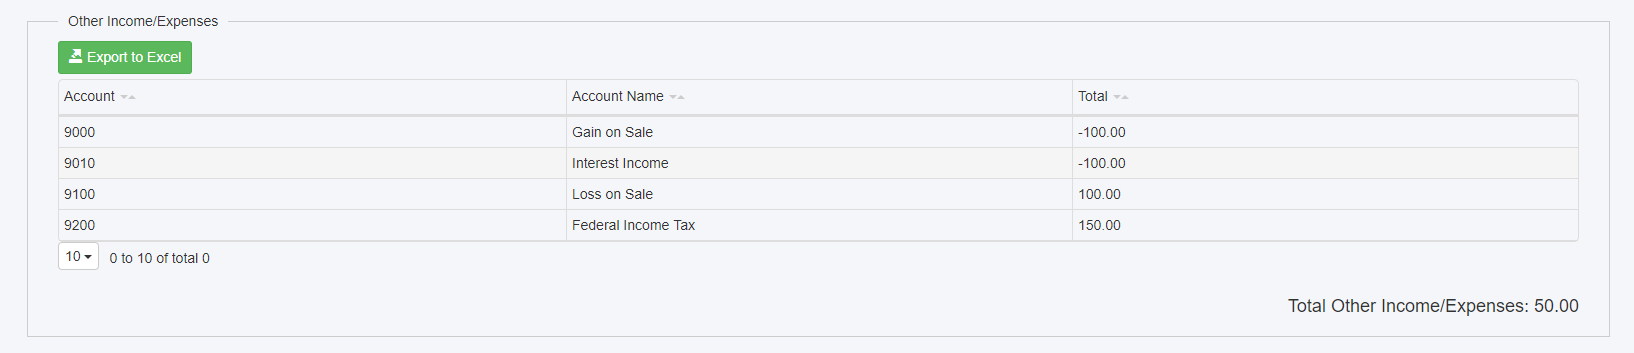
Net Income represents the money that is left over after subtracting all the costs and expenses you incur. If this number is positive, your company made money. If this number is negative, you need to reevaluate your expenses, as they are greater than your income.
Net Income = Net Ordinary Income – Other Expenses
At the bottom you will see all 4 calculations: Gross Profit Load, Gross Profit, Net Ordinary Income and Net Income.

To download Profit & Loss report click on the Create Excel button.

Accounting / Adding a New Vendor
Step 1.
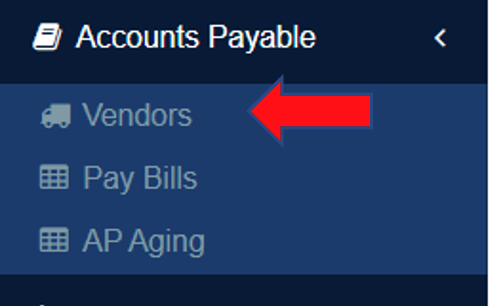
Click on Vendors under Accounts Payable.
Step 2.
Click on 

Step 3.
Under “Basic Details” enter the name of the vendor and vendor type (and any other information needed such as the address) and click on “Save Vendor Data”. Additionally you can add the default expense account and preferred payment method under “Payment Details” so that it can be automatically selected when creating a new invoice and under “Insurance Details” you can enter the insurance details of the vendor.

Accounting / Creating Vendor Invoice
Step 1.
Click on Vendor under Accounts Payable

Step 2.
Select the vendor in question that you wish to create an invoice for.

Step 3.
In Invoices tab click on +New button

Step 4.
Enter your invoice number, invoice date, invoice due date and enter memo if needed. Once you have entered your invoice data, click on + New.

Step 5.
Enter your invoice price, quantity, GL account and enter description then click on “Ok”.

Step 6.
Your invoice will be here under “Invoices” and you can edit, delete or upload a document if needed.

Step 7.
If you have a PDF, you can use our AI reader to have it create the invoice for you. Click on “Upload Invoice to create” and upload your invoice and it will open the invoice creation form and fill out the invoice data for you. If everything is correct, click on “Ok” to create the invoice.

Second option
You can go to Accounts Payable > View invoices where you will have a table with your invoices in one place and from there you can also create new invoices both manually and with AI by clicking on “Create Invoice” which will open the invoice creation form where you can choose your vendor and start to create your invoice.

Accounting / Adding a Credit Memo
Step 1.
Under Accounts Payable click on Vendors.

Step 2.
Select a Vendor from the list

Step 3.
Scroll down to Vendor Invoices, select an Invoice you would like to apply a credit to and click on Add Vendor Credit.

Step 4.
Fill out the Amount and Description field.

Step 5.
Click on Add Credit Memo.
Accounting / Applying a Credit Memo
There are two ways to do this. The first one is the following:
Step 1.
Under Accounts Payable click on Vendors.
Step 2.
Select a Vendor from the list

Step 3.
Go to Vendor Payment table and click New.

Step 4.
Select the Invoice the credit memo will be applied to. Select Use Credit then pick the credit from the dropdown menu titled Credits List.
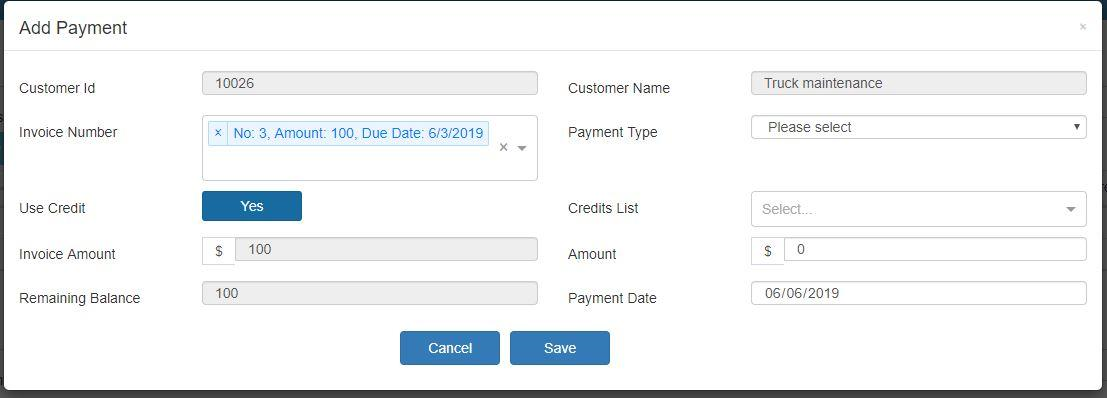
Step 5.
Click Save.
You can also Apply a Credit Memo as a Payment the following way:
Step 1.
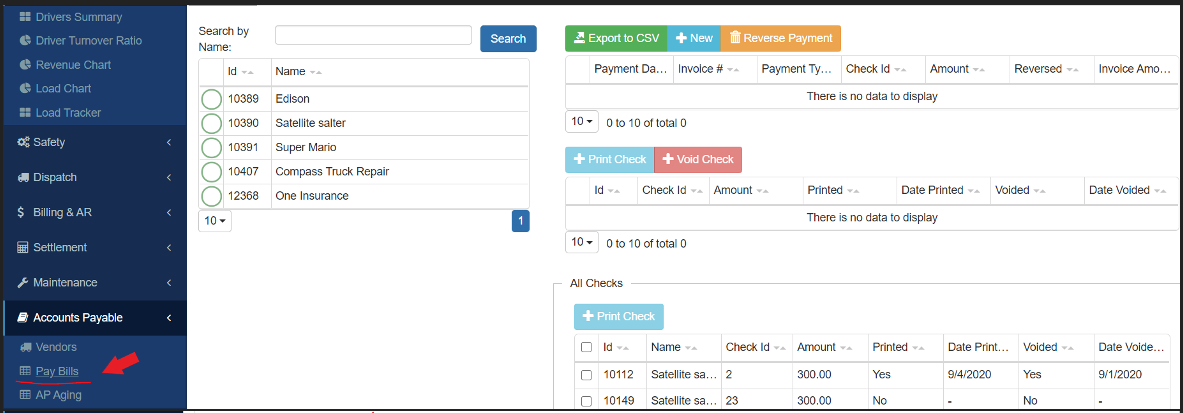
Under Accounts Payable click on Pay Bills.
Step 2.
Under the Pay Bills table click on New.

Step 3.
Select the Invoice the credit memo will be applied to. Select Use Credit then pick the credit from the dropdown menu titled Credits List.

Step 4.
Click Save.
Accounting / Pay Vendor Invoice
Step 1.
To apply payment to an invoice, click on Pay Bills under Accounts Payable. Search for the vendor by name or by using the “Unpaid Vendors” filter and select it, then click on + New

Step 2.
Select the invoice, payment type and adjust payment date then click on “Save” to confirm payment.

Paying vendor bill can be completed from Vendor page as well.
Step 1.
Select the vendor in question and click on “Payments”

Step 2.
Click on + New

Step 3.
Select the invoice, payment type and adjust payment date then click on “Save” to confirm payment.

Accounting / Credit Card Payment
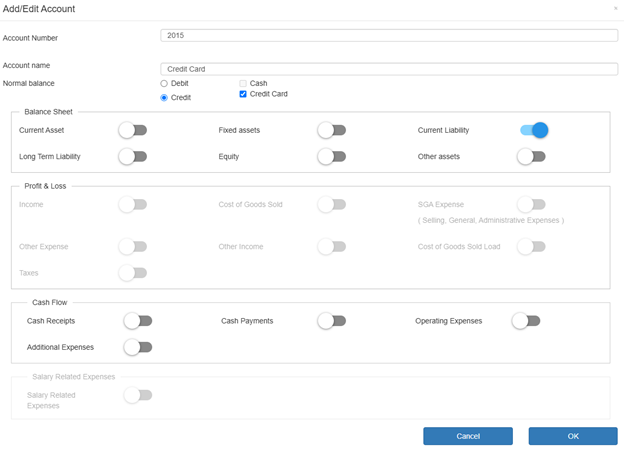
Step 1. (Create Credit Card Account)
Under General Ledger click on “Chart of Accounts” to create a new GL account. To create your Credit Card account, select “Current Liability” and then check the box labeled “Credit Card”.
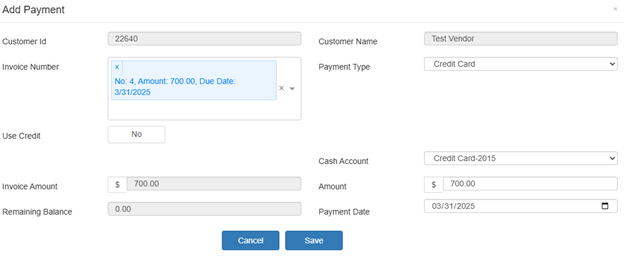
Step 2. (Vendor payment with Credit Card)
When confirming the payment of a vendor invoice, you can click on “Payment Type” to select Credit Card and under “Cash Account” you can select the credit card’s account.
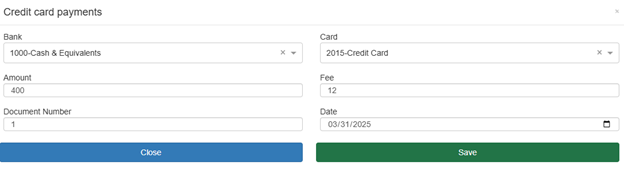
Step 3. (Credit Card Payment)
In Accounts Payable > Pay Bills you can enter the credit card payment by clicking on “+Credit Card payments”. Select the bank and the card, enter the amount and the bank fee. By clicking the Save button, a new General Journal entry will be created.
Accounting / Adding and paying Invoices at once
Step 1.
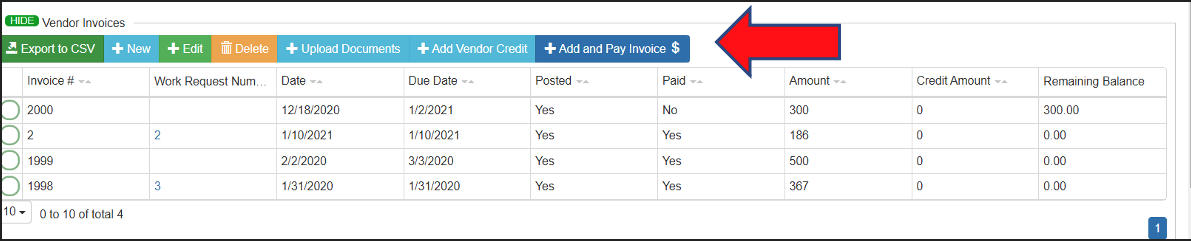
Go on Vendors module – Choose vendor from the list and then scroll down on Vendors Invoices and click on the Add and Pay Invoices
Step 2.
New window opens for entering and paying invoices.
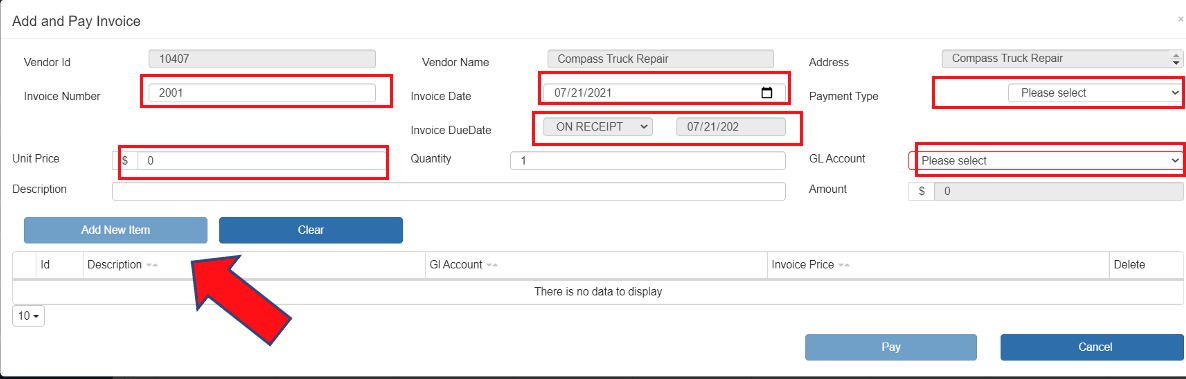
Step 3.
All red squares need to be entered with data from invoice just like in Adding invoices. Once everything is entered button Add New Item will be available.
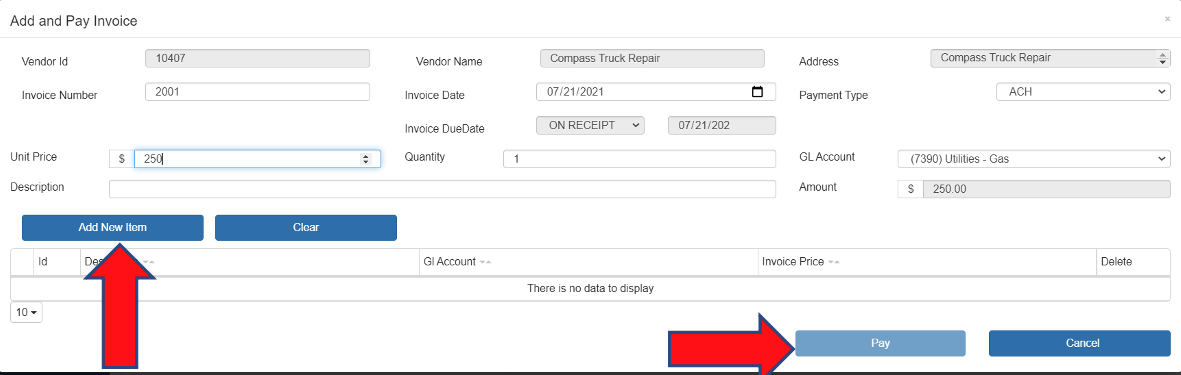
Step 4.
Click on Add New Item button to add it on the table below for payment. You can add as much items as you have on the invoice. When you finish with adding items, click on the Pay button.
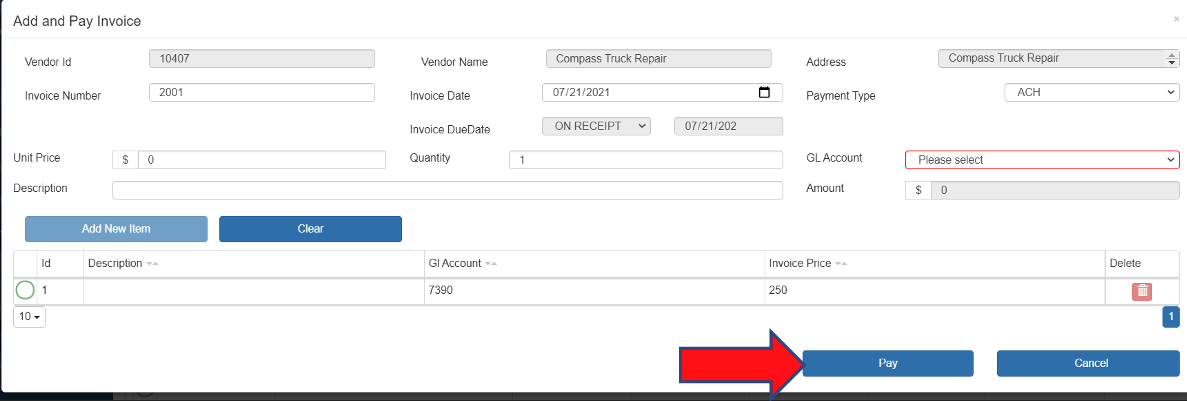
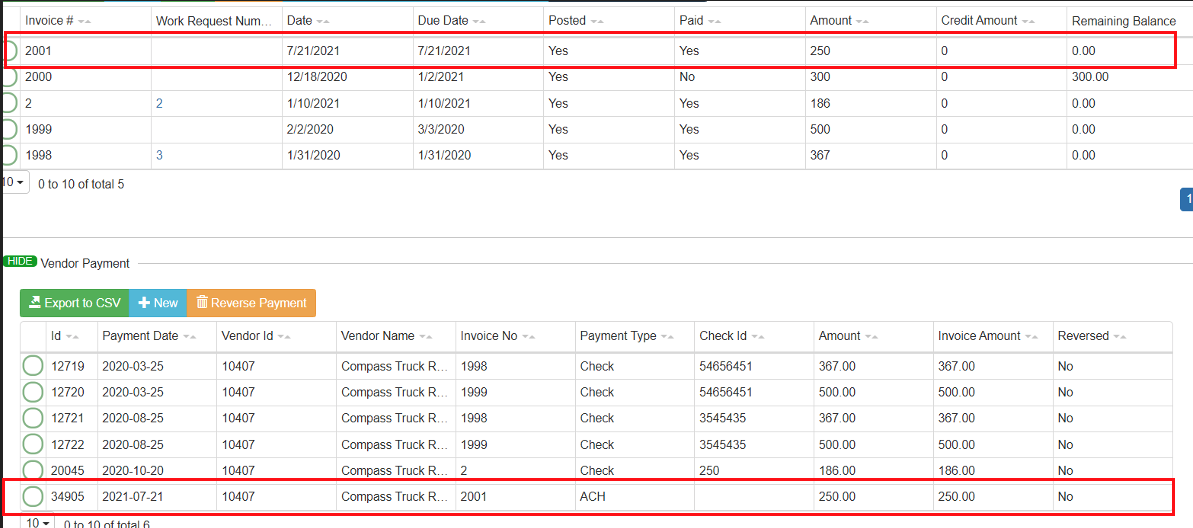
Step 5.
Once you pay it you will see the invoice on the Vendor Invoices and Vendor Payment table.
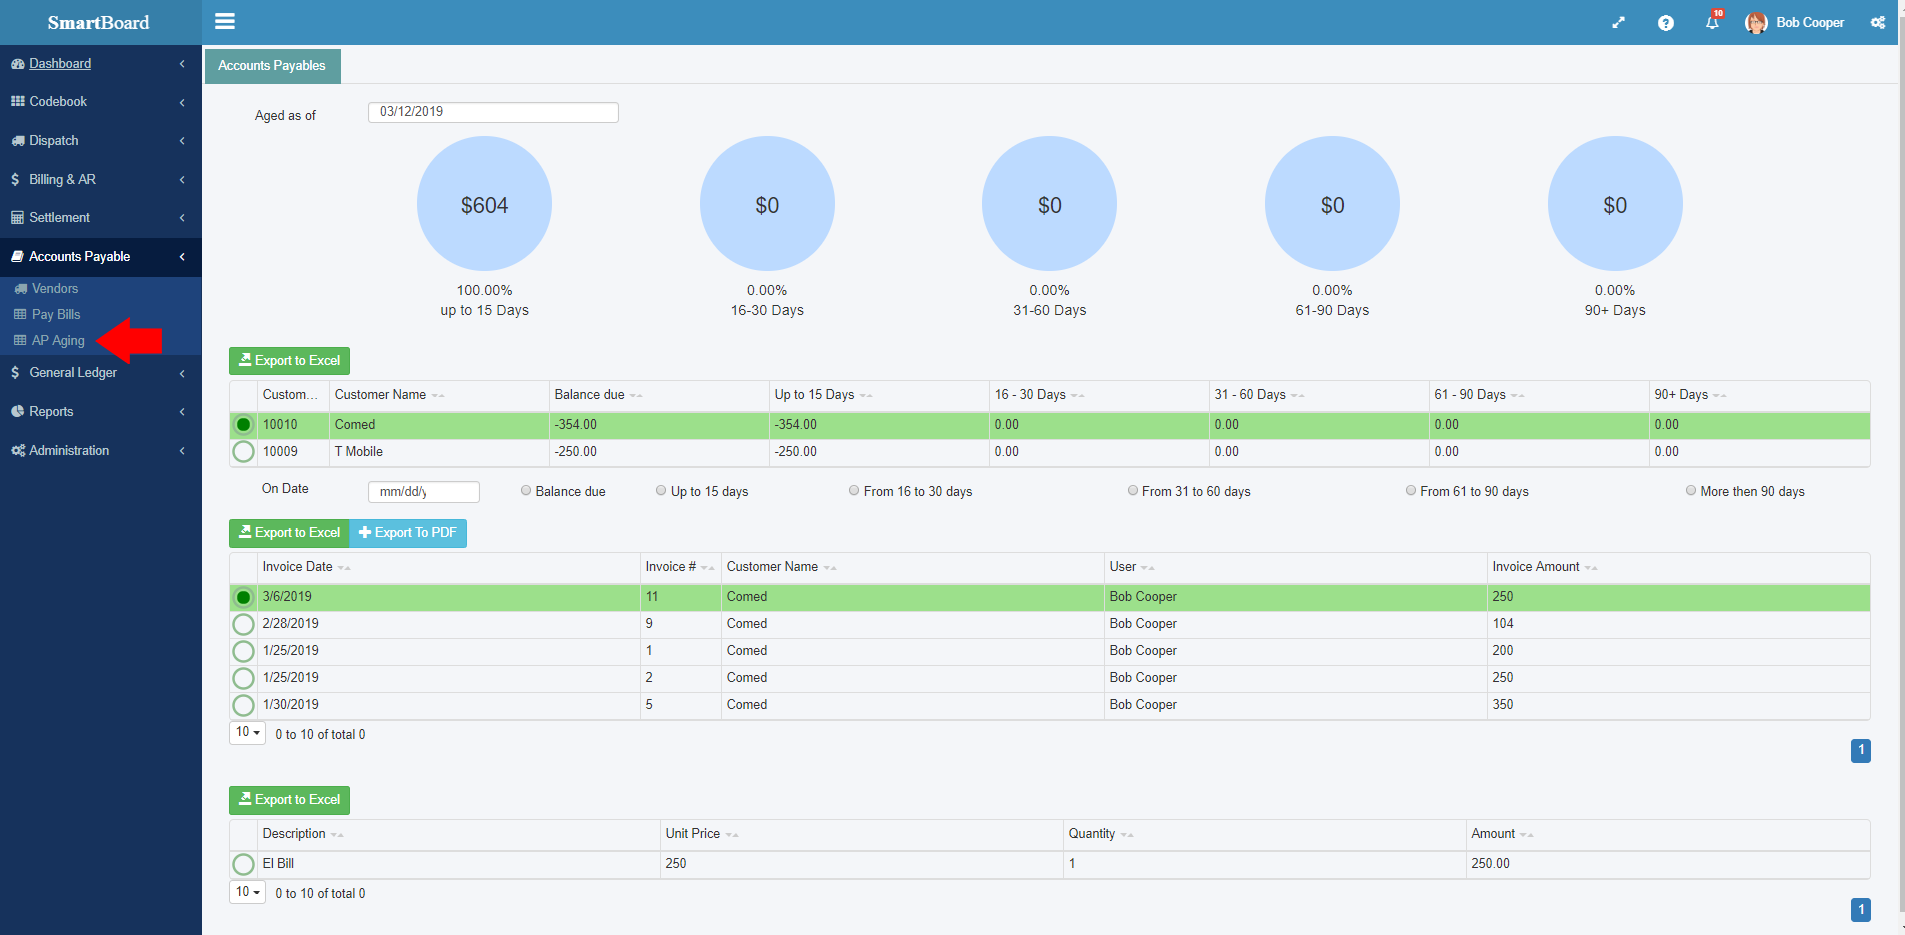
Accounting / AP Aging
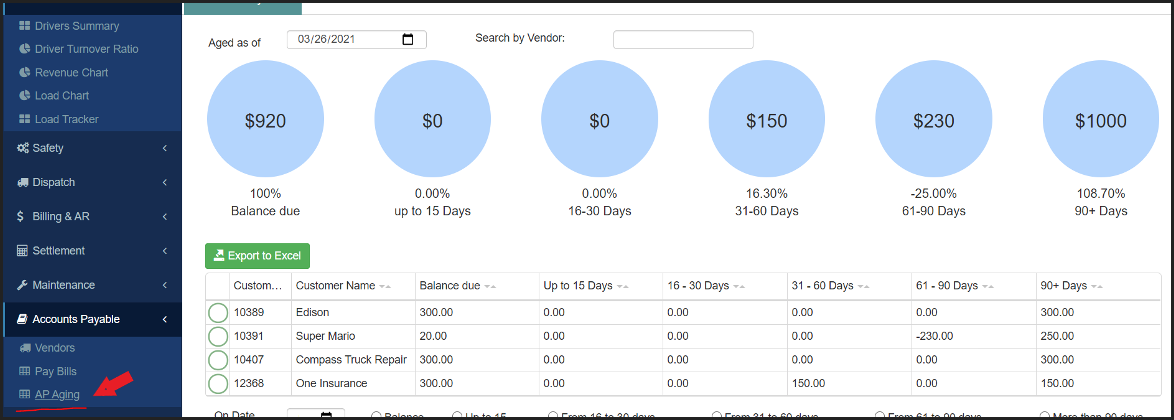
The Accounts Payable Aging Report (Accounts Payable -> AP Aging) shows all your unpaid vendor invoices grouped by the number of days that have passed since you received that invoice.
This report is the opposite of AR Aging report. The AR Aging Report allows you to view the balances that are owed to your company by your customers. On the other side, the AP Aging report allows you to view the balances you owe to your vendors for services your company receives.
The AP Aging Report helps you figure out if you are paying your bills on time, which invoices you are late to pay and ultimately helps you prioritize which invoices you want to pay first. If the report shows overdue bills, it could mean you are not controlling your cash flow successfully. So, by being aware of the outstanding amount you must pay, you can take the steps necessary to decrease your liabilities and improve your profit margin.
The report is sorted by your vendors, and by clicking on a vendor listed in the main table you can expand it to see all the separate outstanding invoices that reflect the outstanding balance you have for that vendor.
On top of the table a summary is shown of the outstanding amount in each group.
• The first circle shows the total amount of all invoices that are not paid up to 15 days or less, since the day invoice is received.
• The second circle shows the total amount of all invoices that are not paid in 16-30 days from the day the invoice is received.
• The third circle shows the total amount of all invoices that are not paid in 31-60 days from the day the invoice is received.
• The fourth circle shows the total amount of all invoices that are not paid in 61-90 days from the day the invoice is received.
• The final circle shows the total amount of all invoices that are not paid over 90 days from the day the invoice is received.
Accounting / Void a Check
Step 1.
Click on Pay Bills under Accounts Payable
Step 2.
Select a customer on customer list
Step 3.
Select a check
Step 4.
Click on “+Void Check”
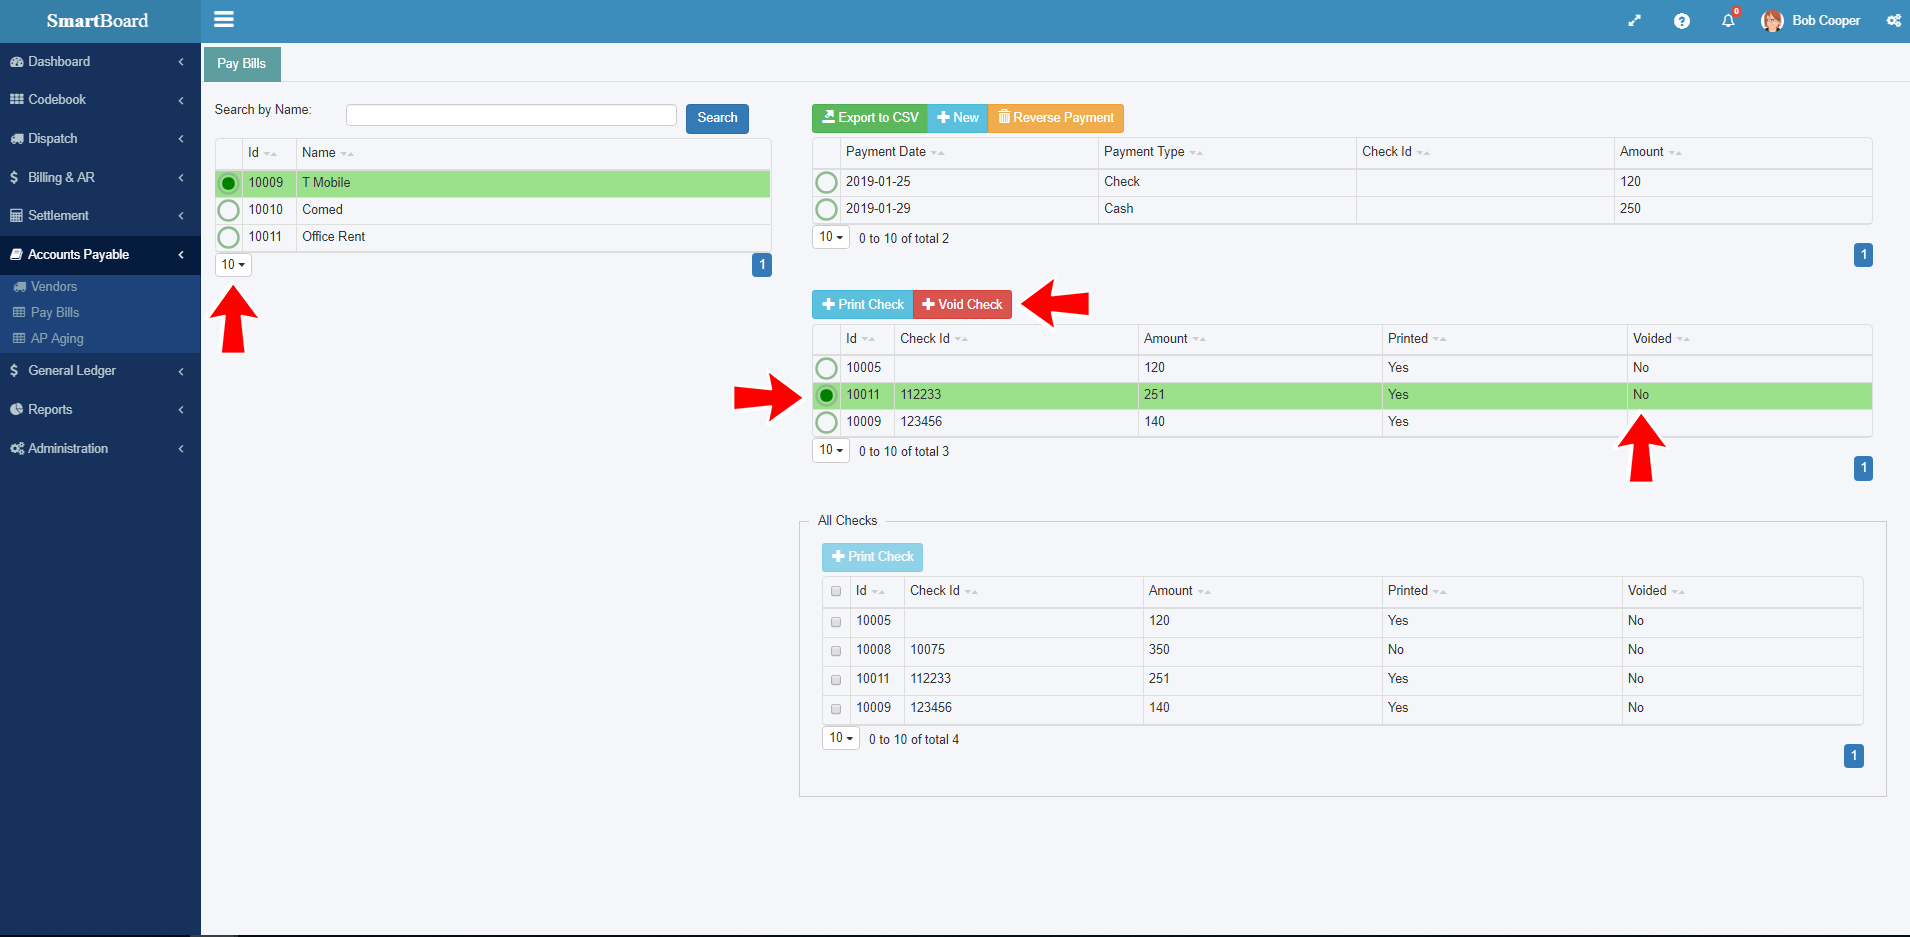
Check is voided and in voided column will display “Yes”.
Accounting / Bank Reconciliation
A bank reconciliation is the process of matching the balances from your cash account (accounting records) to the corresponding information on a bank statement. With bank reconciliation you check if all payments and cash collections have been processed and deposited into a cash account.
Step 1.
Click on the Bank Reconciliation under General Ledger. The Start Reconciliation window opens and click on “+Reco” to start reconciliation. (In case you do not have Bank Reconciliation listed under General Ledger module – you should go under Administration -> Roles -> Click on your role -> Add -> Add -> choose from the list “Bank Reconciliation”).

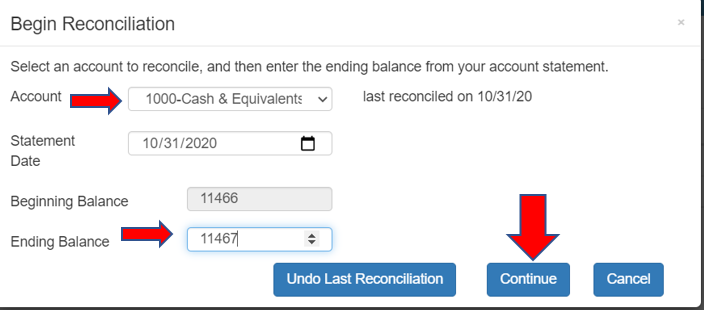
Step 2.
In the Account drop down list, choose the account you want to reconcile. To create accounts in drop down list you have to set it up in Chart of accounts -> on the account you want click update and choose Cash option below the account name

Step 3.
Check if the Statement Date match with your Bank Statement ending date, if not replace it with the date from your statement. In the Ending Balance box, type the ending balance from your bank statement. Beginning balance for this reconciliation is the ending balance for the previous reconciliation (unless this is your first reconciliation). If the beginning balance does not match the beginning balance on your bank statement, you need to correct that discrepancy before you can reconcile the account. To correct discrepancy, you should undo last reconciliation, and then correct Cash account by debiting or crediting it with the necessary journal entry.
Step 4.
Click Continue to start the reconciliation process.
Step 5.
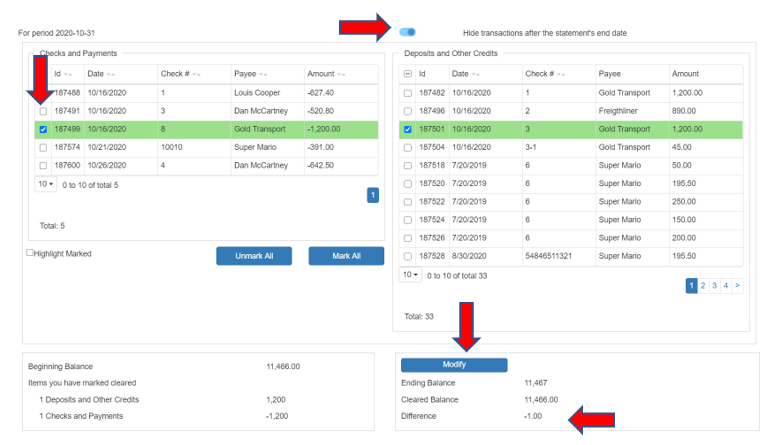
When you click Continue on the Reconcile Transactions new window opens. Checks and Payments are grouped on the left side, and deposits and other credits on the right side. To mark transactions, User just clicks the checkmark. For each transaction that appears on the bank statement, user will click on the checkmark for the matching transaction in the system. Unchecked means uncleared, which means it must show on the next reconciliation.
When you mark transactions as cleared by turning on their checkmarks, the Cleared Balance and Difference values below table change to reflect the transactions you select. When the difference value equal 0.00 the reconciliation is complete.
Turn on “Hide transactions after the statement's end date” so the Reconcile window displays only transactions dated prior to the reconciliation date.
Buttons Mark All - checks all transactions at once and Unmark All - undoes the checking of transactions.
See below Beginning Balance - Deposits and Credits and Checks and Payments - adds up as you check mark the transaction. See on the page two transactions of $1,200 are checked so we have 1 Checks and Payments $1,200 and 1 Deposits and other credits with balances $-1,200
Ending Balance - what you type in the start reconciliation window – here as well you can change this amount by clicking on button Modify.
Cleared Balance = Beginning Balance (11,466) - What is checked (1,200-1,200) = 11,466
Difference = Ending Balance - Cleared Balance
Step 6.
Reconcile Now button ends the Reconciliation process and only allows if difference is 0. Leave - you can stop the reconciliation at any time and next time continue with the reconciliation process from where you left off (works as a save button).
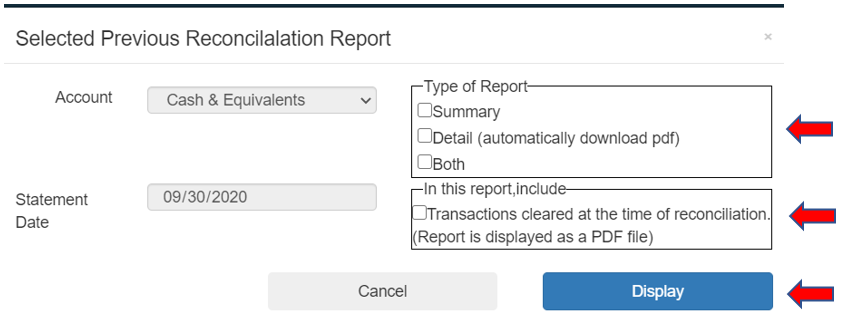
Creating Reconciliation reports
Step 1.
Mark Bank Rec which you want to print then click “Show Reports” (only bank reconciliation with status “Finished” can be used for creating reports).

Step 2.
To create report, click on the Report button. Also, here you can search bank reconciliation by amount, check #, customer or date.
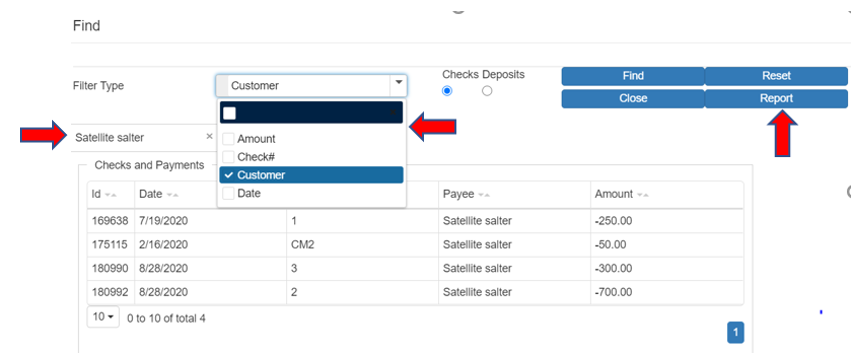
Step 3.
In this step you can choose if report will be displayed as summary, detail report or combination of both. As well you can choose if the report will include transactions cleared at the time of reconciliation. To do this you need to select the checkmark on the right side. By clicking on Display, the report is ready to be downloaded or printed.
Accounting / Add Deposit
A Deposit is any amount of money that we are putting in the bank. Using deposit, you can track all deposits that you have received on your bank account from anyone.
Step 1.
Click on the Add Deposit module under General Ledger. The Add deposit window opens and click on “+New” to enter the deposit. After this new window will open.

Step 2.
1. In the bank (deposited to) users can choose (in case it has more than one bank account) on which account deposit is made.
2. Payer (Received From) – from whom did we receive money (there is the list on which user can choose as customer, vendor, owner…) in case there is some other payer than listed choose others. Here if the vendor is returning money or the customer is paying us some money, we will have additional fields with active customers and vendors, on which user should choose. Customer payments are posted through the Customers Payments, not via Add Deposits, that is why we don’t have invoices here.
3. Account has the list of all active accounts – here the user should choose the account which will be credited.
All fields that are marked red are mandatory and need to be filed, if not OK button will not be available.
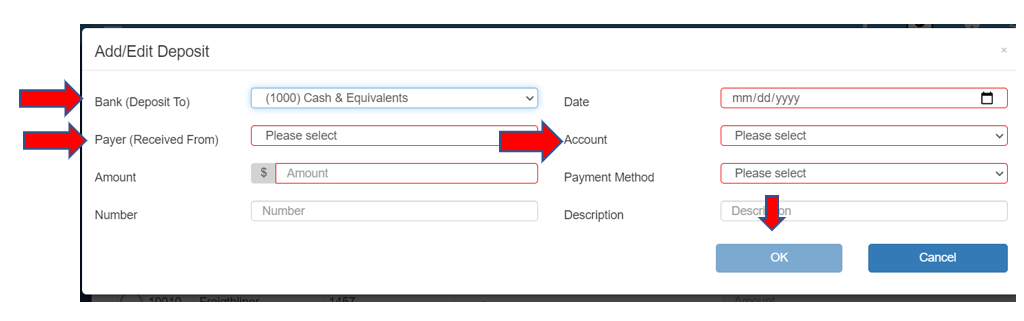
Step 3.
When everything is filed up – press OK, and deposit will be booked in General Journal entry.
Step 4.
Deposit can be printed, simply by choosing the deposit on the Add deposit form that user want to print and press the Print button.
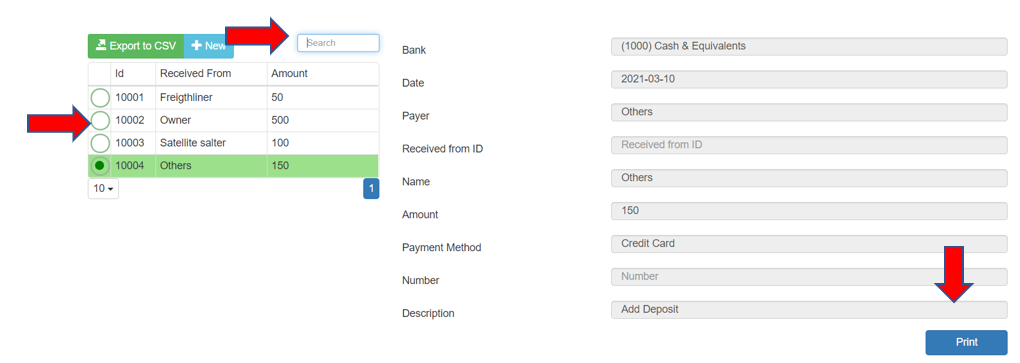
If a user wants to search some deposit in the upper corner there is a field search, where the user can search, per any column in the table.
Add Deposit can be used for transferring money between accounts, just by choosing deposited to Bank Account which it is deposited to and choosing in Account filed account from which money is taken.
All deposits that are entered on Bank Accounts will be shown in the bank reconciliation on deposit side.
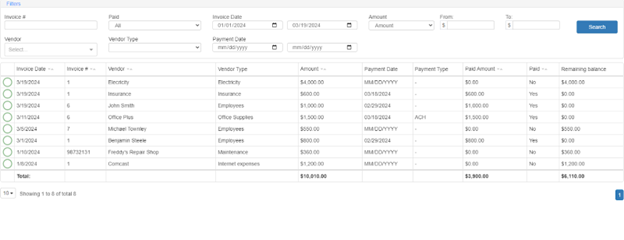
Accounting / View Invoices
Click on View Invoice under Accounts payable.
On the View Invoices page, a user can see all created invoices. You can filter the invoices you’re looking for by Invoice #, Invoice and Payment date, Invoice amount, vendor, vendor type. You can use the “Paid” filter to only see invoices which have been paid or which have yet to paid. On the bottom you will be able to see the total amount.